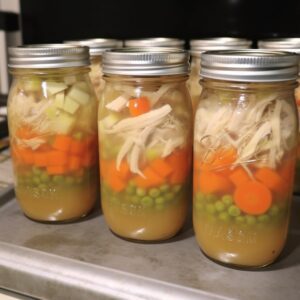
Chicken Soup Recipe For Canning
A ready-to-served nutritious, tasteful homemade pressure canning chicken soup
Equipment
- 1 Pressure canner with canning rack
- 8 Pintsized canning jars or 4 quart-sized jars
- Canninglids and bands (new lids for each jar, bands can be reused)
- Canning Tools jar lifter, canning ladle, funnel, and bubble popper
- Basic kitchen supplies
Ingredients
- 4 quarts of homemade chicken broth or chicken stock
- 3 cup of diced and cooked chicken
- 1 cups celery chopped (roughly 3 stalks)
- 1 cup of sliced carrots
- 1 cup of chopped onion
- 1 cup of peas
- Salt and pepper to taste
Instructions
Making Chicken Soup
- Wash the fresh vegetables thoroughly.
- Peel the carrots and tomatoes to remove bacteria.
- Dice the onion finely.
- Soak and rehydrate dried beans or peas if using.
- Fill each jar with previously prepared chicken broth.
- Cook the chicken and cut it into bite-sized pieces.
- Mix chicken stock, chopped veggies, diced chicken, parsley, and seasonings in a large saucepot.
- Heat the mixture to a mild simmer for 15 minutes.
Pressure Can Chicken Soup
- Gather the necessary equipment: pressure canner, canning jars, lids and bands, jar lifter, canning ladle, funnel, bubble popper, slotted spoon, clean kitchen towels.
- Wash all the canning supplies in hot, soapy water.
- Assemble the pressure canner and add water according to the manufacturer's instructions.
- Preheat the canner and fill clean jars halfway with boiling water
- Use a jar lifter to take a jar from the canner and set it on a towel.
- Fill the jar with solid components and pour liquid, leaving 1 inch of headspace.
- Process chicken soup jars in the pressure canner for 75 minutes (pints) or 90 minutes (quarts), optimizing for altitude
- Use a bubble popper to remove air bubbles and clean the jar's rim.
- Lock the canner's lid into place and increase the heat to medium-high until it boils.
- Allow the canner to cool naturally.
- Carefully remove the jars and let them cool completely.
- Wash the jars with warm, soapy water.
- Label each jar with contents and canning date.
- Store the canned chicken soup properly for 12 to 18 months.
Notes
- To prevent contamination and foodborne diseases, maintain good hygiene and cleanliness throughout the canning process.
- Feel free to choose the veggies according to your preferences, but prioritize those that can be safely pressure-processed for effective canning.
- Prepare fresh veggies by thoroughly washing them in clean, running water. To get rid of microorganisms, peel the tomatoes and carrots. Slice onions thinly. If using dried beans or peas, soak and rehydrate them.
- Prepare the chicken by cooking it before putting it in the soup. It is advised to boil or roast the chicken until it is tender. Cut the chicken into bite-sized pieces after removing the skin and bones.
- Modifying your pressure matching your altitute (See section above)