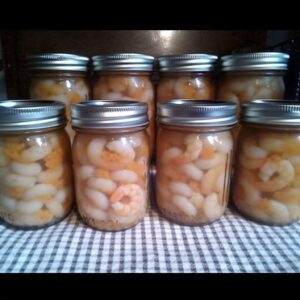
Pressure Canning Shrimp Recipe
Yummy Fresh Pressure Canned Shrimps ready-to-use all year around or for any shrimp dishes
Equipment
- Pressure Canner
- Stock Pot
- Large Bowls
- Funnel
- Canning Jars
- Paper Towel
- Jar Lifter
- Kitchen Towel
Ingredients
- 2 gallon water
- 2 cups salt
- 4 tablespoons salt
- 2 cups vinegar
- 5 pounds shrimp tiger or pink shrimp would be really tasteful
Instructions
Preparing Shrimps for Canning
- Prepare the pot; add water, vinegar, and salt as brine for flavor.
- Wash and drain the shrimp for a fresh start.
- Boil the shrimp for 10 minutes like a spa session.
- Transfer to cold water to preserve tenderness.
Pressure Canning
- Peel the shrimp and pack them into jars, leaving 1 inch of headspace.
- Ladle the hot brine over the shrimp. If you're watching your salt intake, use boiling water and omit the salt.
- Remove any air bubbles and add brine to maintain the 1-inch headspace.
- Wipe each jar rim with a warm wet washcloth dipped in vinegar.
- Place the lid and ring on each jar and hand tighten.
- Add hot water to your pressure canner as per the manufacturer's requirements (often 3 quarts).
- Place the hot jars in the pressure canner, lock the lid, and put the canner on high heat, bringing it to a boil.
- Let the canner vent for 10 minutes, then close the vent and continue heating to achieve 11 PSI for a dial gauge and 10 PSI for a weighted gauge, or according to your elevation.
- Process both pints and half-pints for 45 minutes.
- Once the canner is at zero PSI, remove the lid, deflecting the steam away from your face.
- Allow the canner to sit undisturbed for 10 minutes before removing the jars from the canner.
- Place the jars on a cutting board and allow them to cool undisturbed for at least 8 hours or overnight.
- Once all the lids have been sealed and the jars have fully cooled, remove the rings and wash the jars in warm soapy water.
- Store the rings to reuse, then label each jar with the name and date before storing.
Notes
- Add flavor and seasoning: While you can simply shrimp with water, adding some seasoning can enhance the flavor. You can use salt, pepper, garlic, or other spices.
- Pack the jars properly: Fill hot, sterilized canning jars with the prepared shrimp, leaving enough headspace as specified in the recipe. Headspace allows for proper expansion during the canning process.
- Add liquid: Pour boiling water, shrimp stock, or a mild brine (follow the recipe guidelines) over the shrimp in the jars, leaving the specified headspace.
- Store in a cool, dark place: Find a cool, dry storage area to keep your canned shrimp. A pantry or cellar works well if it maintains a consistent temperature and is away from direct sunlight.
- Check for spoilage: Inspect your canned shrimp for signs of spoilage, such as a broken seal, visible mold, or any off smells or flavors. If you encounter any issues, discard the contents immediately.