Canning Pulled Pork Recipe
In the realm of culinary mastery, few dishes captivate the senses and palates quite like tender, succulent pulled pork. Imagine sinking your teeth into strands of perfectly seasoned and slow-cooked pork, each bite infused with a symphony of flavors
Equipment
- Pressure Canner
- Canning Jars
- Canning Kits Jar Lifter, Racks,...
Ingredients
Pulled Pork:
- Pork shoulder or Boston butt chosen based on preference
- Aromatic spices for dry rub
- Wood chips for smoking if using a smoker
- Cooking juices for drizzling
Signature BBQ Sauce
- Plain ketchup avoid high-fructose corn syrup
- Apple cider vinegar
- Brown sugar about a quarter cup
- Honey a few teaspoons, preferably local honey
- Worcestershire sauce
- Stone House Seasoning mixture of spices
- Lemon juice about a tablespoon
- Hot sauce optional, for heat
- Other optional ingredients for the BBQ sauce not explicitly mentioned, but you can add them if desired
Instructions
Making Pulled Pork
- Select your preferred cut: Pork shoulder or Boston butt.
- Pat the chosen pork cut dry with paper towels.
- Apply a flavorful dry rub to the pork, massaging it into every nook and cranny.
- Marinate in the fridge for a few hours or longer for enhanced flavor.
- Choose your cooking method: oven, smoker, or slow cooker.
- Set the oven temperature to 225-250°F (107-121°C).
- Cook the pork low and slow for about 18-26 hours, depending on desired tenderness.
- Use soaked wood chips for added flavor complexity.
- Allow the cooked pork to rest for about 30 minutes.
- Gently shred the meat into bite-sized strands.
- Serve the pulled pork as desired – on buns, tacos, or your preferred style.
Making BBQ Sauce
- Combine ingredients for the BBQ sauce: ketchup, apple cider vinegar, brown sugar, honey, Worcestershire sauce, Stone House Seasoning, lemon juice, and optional hot sauce.
- Simmer the sauce for about 10 minutes until thickened.
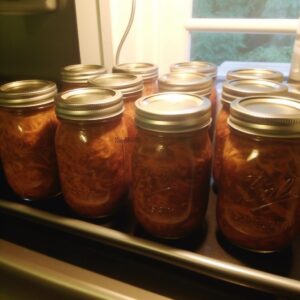
Pressure Canning
- Thoroughly wash canning jars.
- Ladle the pulled pork into jars, layering with beef stock or BBQ sauce.
- Seal the jars with lids and rings, ensuring they are tightly closed.
- Place the jars in a pressure canner.
- Adjust pressure based on altitude for precise cooking.
- Follow the canner's instructions for sealing and processing.
- After processing, carefully remove the jars from the canner.
- Allow the jars to cool on a towel-lined countertop.
- Wait for the jars to cool and lids to seal.
- Press the center of each lid to confirm a secure seal.
- Remove any bubbles or imperfections in the canned pork.
Notes
- Make sure you have a reliable pressure canner that's in good condition and has an accurate pressure gauge.
- Use appropriate canning jars, lids, and rings that are in excellent shape.
- Use fresh, high-quality pork for the best flavor and texture.
- Season the pulled pork with your preferred spices and flavors before cooking.
- Fully cook the pulled pork before canning to ensure safety. It should be cooked to a safe internal temperature (at least 145°F or 63°C).
- Cook the pork until it's tender and easily shredded. Overcooked pork can become mushy during canning.
- It's best to avoid using thick sauces or gravies in your pulled pork recipe. These can hinder heat penetration during canning, potentially leading to unsafe results.
- Follow the recommended headspace (usually 1 to 1.5 inches) when filling the canning jars. This allows for expansion during processing.
- Stick to tested and approved canning recipes from reliable sources, such as the National Center for Home Food Preservation or reputable canning books.
- Do not modify canning recipes, as changes can affect the safety of the final product.
- Thoroughly clean and sterilize your canning jars and lids before use. This helps prevent contamination and ensures a proper seal.
- After filling the jars, run a non-metallic utensil or a bubble remover tool along the inside of the jar to release any trapped air bubbles.
- Apply lids and rings according to the manufacturer's instructions. Avoid over-tightening the rings, as this can prevent proper venting during processing.